A flawless finish requires meticulous prep work. That’s one of the big reasons professionals can paint cabinets much faster than DIYers.
Kitchen cabinet surfaces accumulate grease, dirt and grime over time. Modesto Cabinet Painters use degreasers to remove it, ensuring an ideal surface for paint adhesion. They also sand and clean the areas to be painted, removing rust and other imperfections. They then apply a high-quality primer, like Fresh Start, that hides, seals and suppresses stains.
Prep Work
A fresh coat of paint is an easy and affordable way to transform kitchen cabinets and create a clean, updated look. But, as with any painting project, proper prep is essential to achieving a professional-looking result that stands the test of time. If you’re planning on taking on this DIY project, consider these tips from cabinet painters in Baton Rouge and surrounding areas to help you get the best results possible.
The first step is to thoroughly inspect your cabinets and decide what type of finish you want. You may already have a color in mind or you may need to determine what shade is right for your space. In either case, it’s important to choose a primer that matches your desired finish or is compatible with the existing color. Without the right primer, your new paint color can appear streaky or uneven and can even chip prematurely.
Next, clean your cabinets to remove any grease buildup. Use a degreasing cleaner or TSP to cut through oil, grime, and other residue. This will ensure that any product you apply to your cabinets will adhere properly and last longer.
After cleaning, it’s important to allow your cabinets to dry completely before starting any work. It’s also a good idea to remove any decorative hardware before beginning to avoid misplacement or damage. Once the cabinets are fully dry, you can reinstall the hardware using screws or new hinges to give your space a final touch.
If you’re reusing existing hardware, it’s a good idea to spray them with a metallic finish to give them an updated look. You can find spray paints in a variety of finishes to match your decor, from gloss and satin to eggshell and matte.
Finally, it’s a good idea to organize your workspace and make arrangements for family members and pets to be out of the way while you’re working. This will help you stay focused and achieve a better finish with fewer interruptions. It’s also a good idea, especially when working with oil-based products or paint sprayers, to have adequate ventilation to prevent toxic fume inhalation.
Primer
A high-quality primer lays the foundation for a successful paint job. It blocks stains, improves adhesion, and helps create a smooth finish that resists mildew. This step is especially important for kitchen cabinets, which are often subject to moisture from cooking and cleaning products. Choose a high-performance acrylic primer, like KILZ 3(r) Fresh Start(r) High-Hiding All-Purpose Primer. It offers maximum hide, seals and suppresses stains, and provides excellent adhesion to wood surfaces, making it a favorite of professional cabinet painters. It also has a mildew-resistant coating that protects against moisture and staining in moisture-prone areas like the kitchen.
Selecting the right paint is another critical decision that affects both durability and appearance. Cabinets are exposed to heat, moisture, grease, and food spills on a regular basis, so they need durable, long-lasting paint that stands up to heavy use. The wrong type of paint or even the incorrect sheen can quickly wear away and look dull, despite the best efforts at repainting.
The best option for most kitchens is a semi-gloss paint. This sheen reflects light and makes the room feel brighter and more open, while still providing a durable, easy-to-clean finish. If you prefer a less glossy sheen, satin is an attractive choice as well.
Once you’ve selected the best cabinet paint for your home, it’s time to apply the first coat of primer. Be sure to follow all manufacturer’s instructions for proper application and drying times. Then, let the primer dry thoroughly before moving on to the next steps.
If you’re changing the color of your cabinets, tinting the primer to match the new shade eases the transition and helps ensure the final coat adheres evenly. If you’re using a latex paint, a water-based primer is recommended. Water-based primers are low in VOCs (Volatile Organic Compounds) and have a quick dry time.
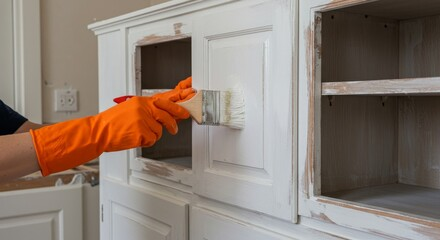
Once the primer is dry, it’s time to apply the first color coat of paint. Choose a brush, roller, or sprayer based on your comfort level and desired finish. A sprayer offers the smoothest, most professional-looking finish, but it requires more prep work, including masking and working in a well-ventilated area.
Paint
Your kitchen cabinets may be worn, stained or faded, but a fresh coat of paint can transform the entire space with minimal investment. The key to a beautiful finish is selecting the right products and application techniques. Professional cabinet painters use high-quality acrylic latex and specialized primers that are designed for kitchen surfaces, so they resist the damage and wear caused by cooking oils, moisture and high heat. This ensures your new look holds up to everyday use for years to come.
Before your cabinet painters start painting, they’ll protect floors, countertops and appliances with plastic sheeting and drop cloths. They’ll also remove all doors and drawers, labeling each one so they return to the correct location. Cabinets then get a thorough cleaning to remove grease, grime, and other residues. Next, all surfaces get degreased and scuff-sanded to create a surface the primer and paint can grip onto. Finally, any dents or dings are filled with wood filler and sanded smooth. This attention to detail gives your finished product a factory-smooth appearance that stands the test of time.
Most cabinet painting projects take 3-7 days depending on the size of your kitchen and complexity of your project. During this time, your cabinet painters will focus on proper prep work to achieve stunning results. Skipping or rushing this step is the biggest mistake homeowners make during DIY projects and leads to poor adhesion, chipping, and peeling.
Once the primer has dried, your cabinet painters can apply two thin coats of your chosen color. For best results, choose a satin or semi-gloss finish to help resist drips and smudges. When the paint has fully cured, you can carefully rehang your cabinet doors and align them with their frames. Then, wipe down all surfaces and touch up any areas that might need a bit of extra attention. When you’re done, sit back and admire your beautifully refinished kitchen!
Finish
A quality finish makes a dramatic impact on the look of your kitchen. Pro cabinet painters know how to get the job done right, resulting in a smooth surface that is easy to clean and stands up to daily wear and tear.
The secret is in the products they use. A quality pro will choose paints and primers that are designed for cabinetry. They may cost more upfront, but they will last longer and are easier to work with than regular paints and primers. They will also use quality brushes and rollers to minimize stippling and other unwanted textures.
Proper sanding techniques also make a huge difference in the final results. A professional knows how much sanding to do, when to do it, and why. A good sanding job will create a smooth and even surface, which will then be ready for painting. A skilled cabinet painter will always go back and sand the finished surfaces to remove any imperfections that would show through the new finish.
Patience is another trait that separates pros from DIYers. A cabinet painter will follow the manufacturer’s guidelines for recoat times—sometimes waiting up to 16 hours between coats. This is to ensure that each coat has the opportunity to set up properly and prevent issues like flashing or poor adhesion. They will also understand that while paint feels dry to the touch within a few hours, it can take weeks before it reaches full curing and durability.
After allowing the final coats of paint to fully cure, the cabinet painters will reinstall doors and drawer fronts, and hardware. They will inspect every surface and handle any touch-ups as needed. They will also walk homeowners through care instructions and answer any questions.
A professional cabinet painter might seem like a luxury, but it is often worth the investment. A professional has the experience, tools, and training to handle all the intricacies of cabinet painting for flawless results that will stand up to the daily wear and tear of a busy household. By hiring a professional, you can save time and avoid frustration, while getting a result that is sure to impress guests and family members.